


In a previous blog post I have written on how to create a Spring Boot application that exposes a discoverable REST API of a simple travel domain model. This guide provides insight on my take-aways regarding lightweight virtualization with Docker and walks you through the process of containerizing the Wanderlust Spring Boot application.
Skip the basics and get me started right away
In case you can not wait and want to try out the Dockerized Spring Boot Application right away, simply follow the next steps. You need to have Java 8 SDK, Git and Docker installed on your computer.
$ git clone https://github.com/cristinanegrean/wanderlust-open-travel-api
$ cd wanderlust-open-travel-api
$ docker-compose up
After above you will have a running multi-container Docker application with a PostgreSQL datastore and a RESTful API. To check it out, use Docker client command docker ps
$ docker ps
CONTAINER ID IMAGE COMMAND CREATED STATUS PORTS NAMES
fbb8a96762db open-travel-spring-boot-docker "java -Djava.secur..." 21 minutes ago Up 21 minutes 0.0.0.0:9000->9000/tcp open-travel-service
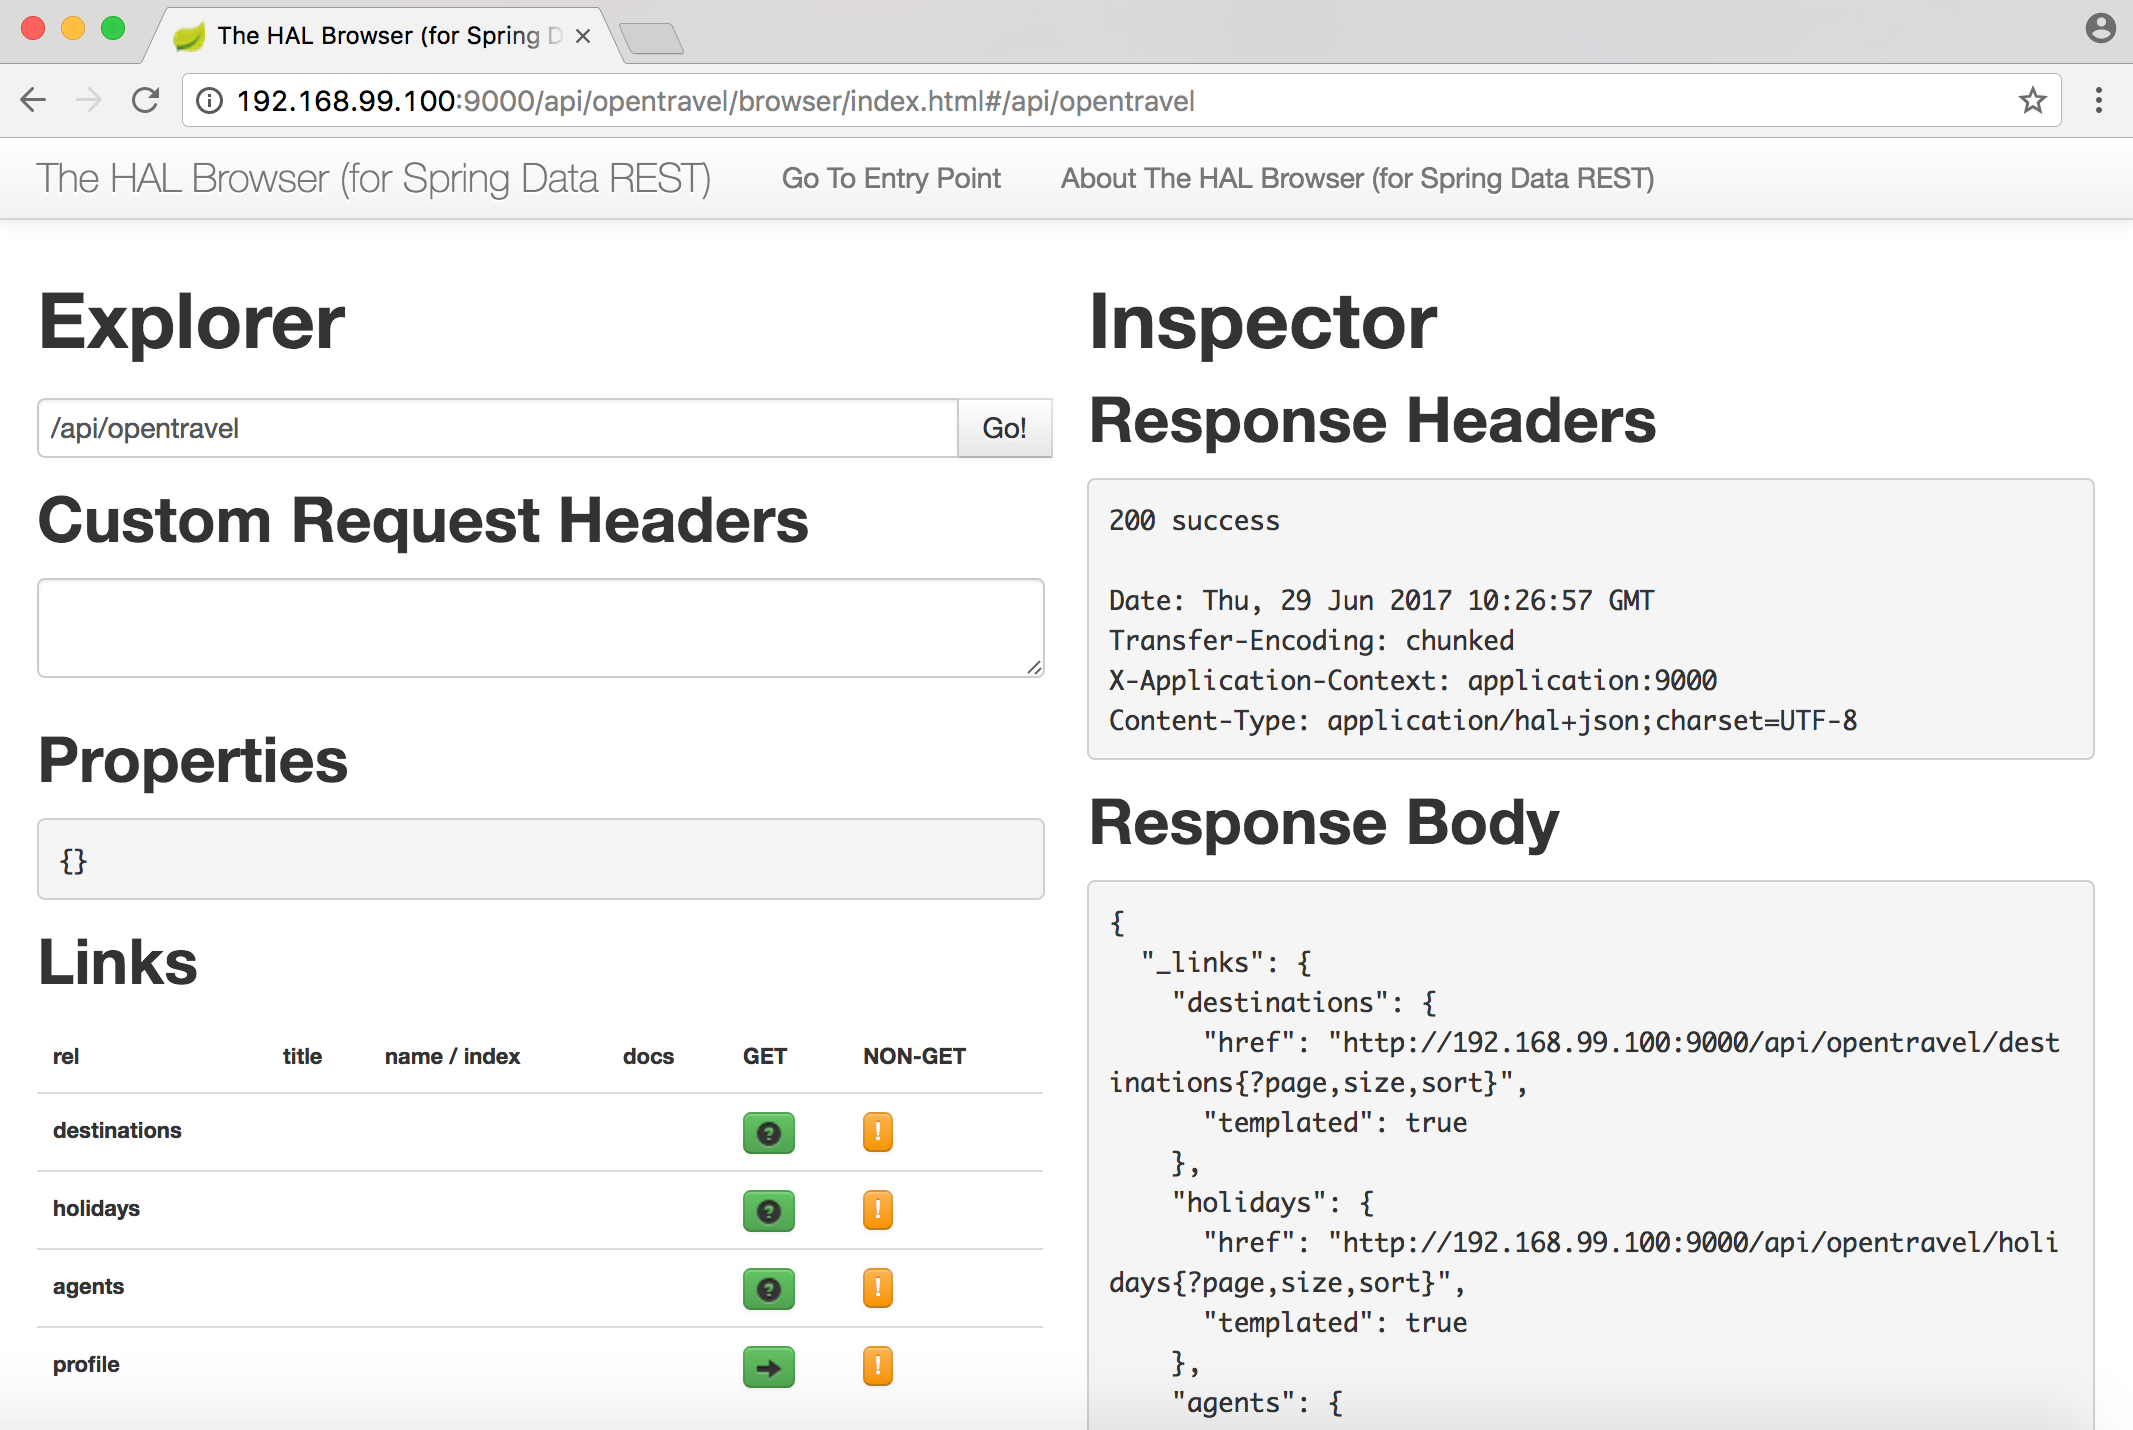
63b39c4345bc postgres:9.6.3 "docker-entrypoint..." 21 minutes ago Up 21 minutes 0.0.0.0:5432->5432/tcp wanderlust-datastoreThe difference from the previous blog post where the RESTful API endpoints and HAL browser where available relatively to http://localhost:9000/api/opentravel/, the data driven RESTful API is accessible from within the Docker host machine.
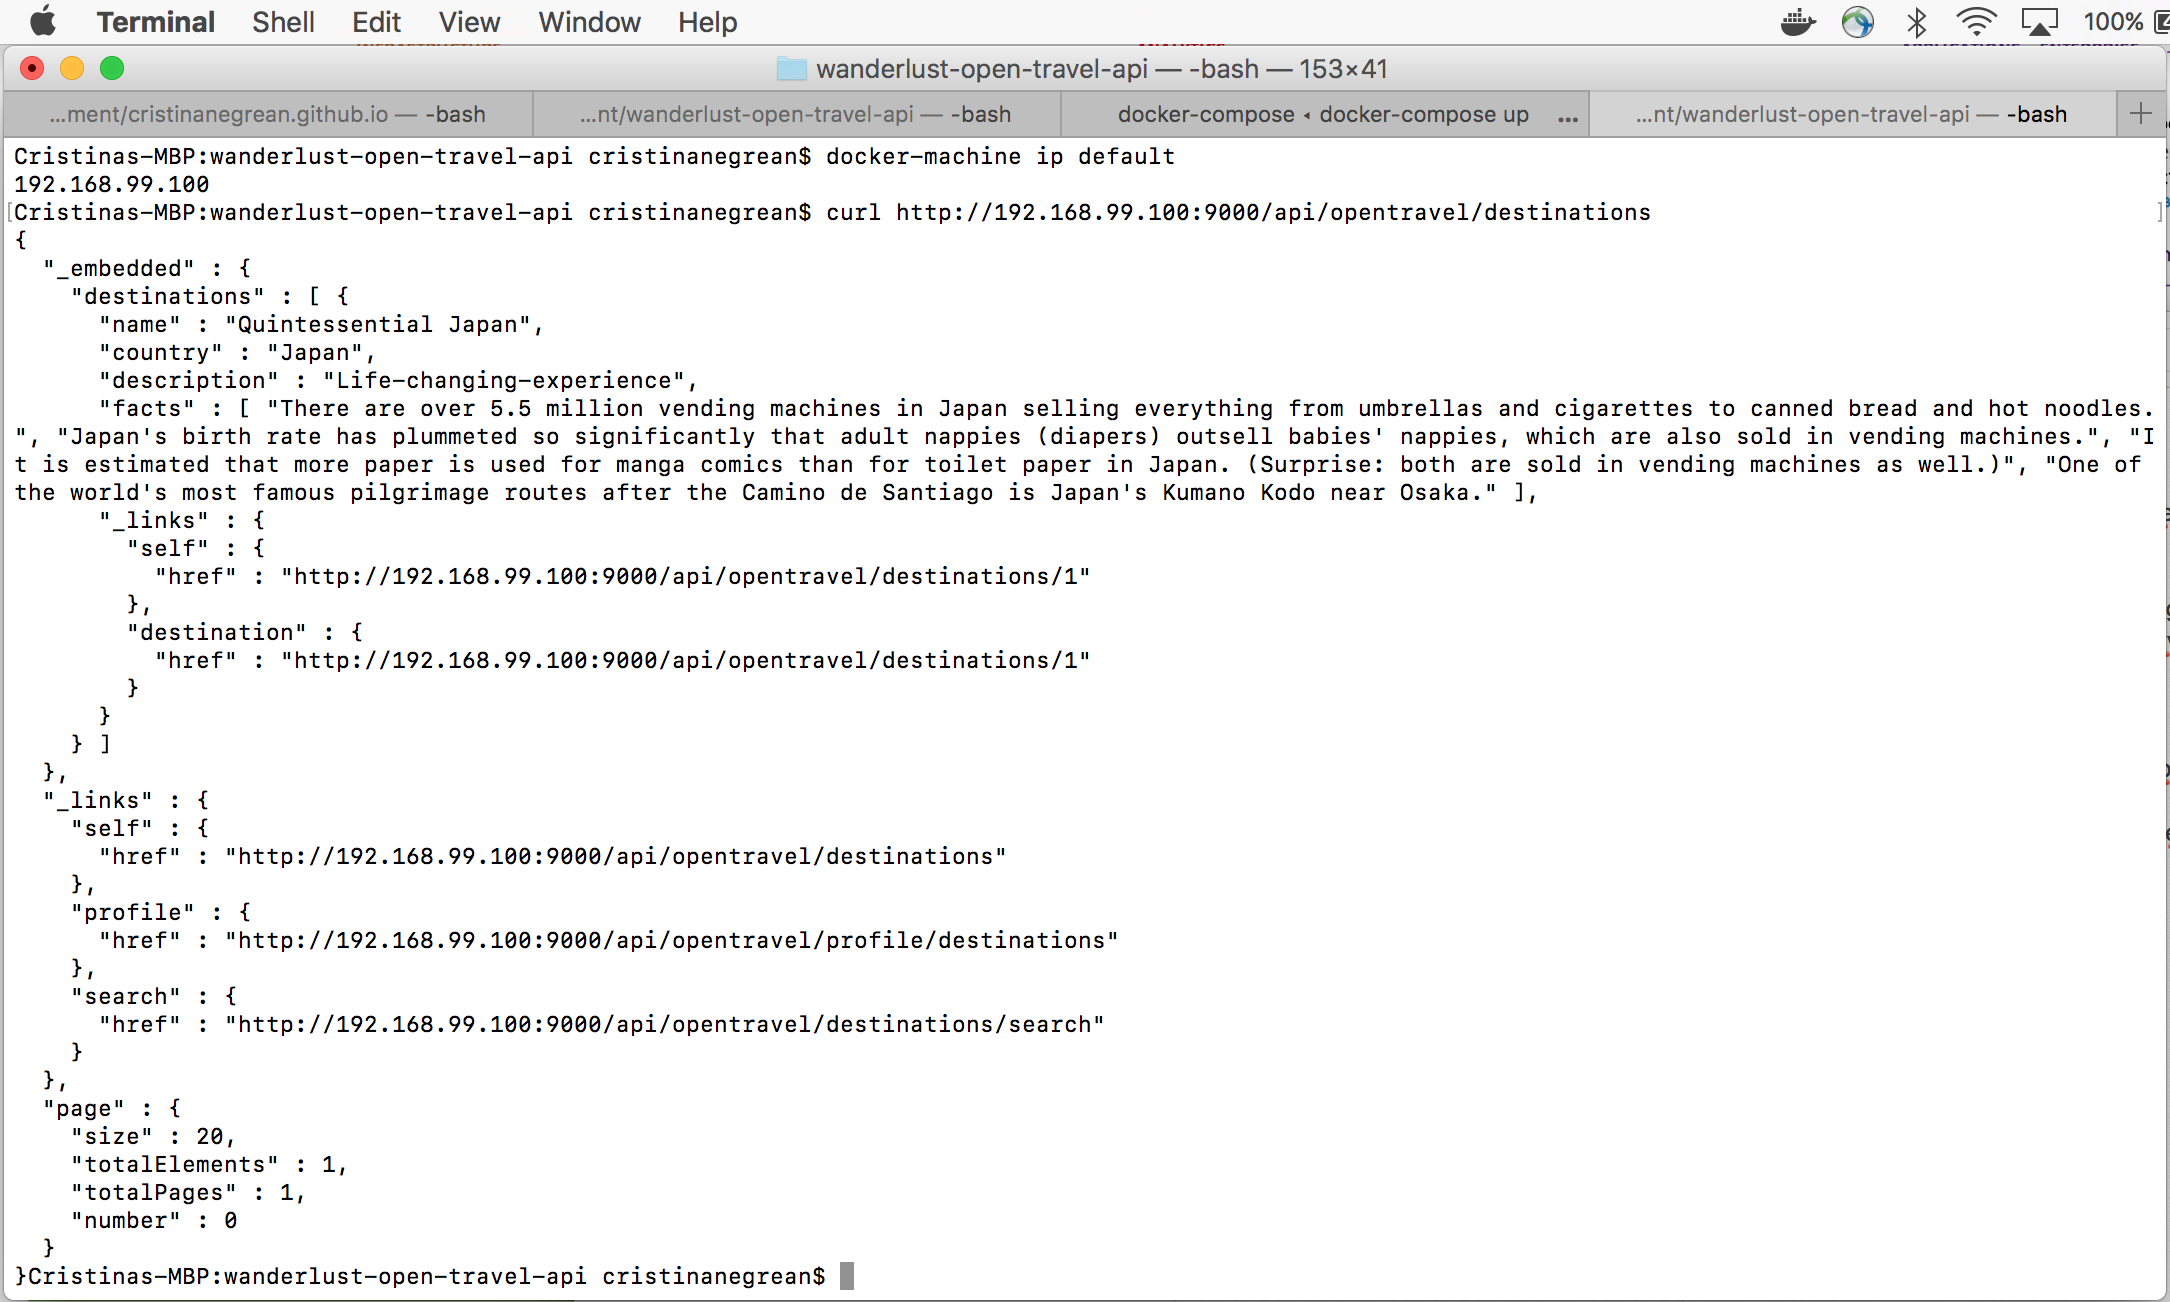
You can use the Docker client or command-line utility to check the ip address where Docker is running:
bash-3.2$ docker-machine ip default
192.168.99.100
and use the IP in the browser or a tool like cURL or Postman to test the Dockerized Spring Boot Data REST application with PostgreSQL datastore.
HAL browser:
List Destinations:
What is Docker?
Docker is an open-source Linux container management toolkit that runs natively on Linux but also works on Windows and Mac using a lightweight Linux distribution and VirtualBox.
Docker makes it easier for organizations to automate infrastructure, isolate applications, maintain consistency, and improve resource utilizations.
It builds upon LXC Linux Container (LXC), which has been part of Linux since version 2.6.24 and provides system-level virtualization. LXC uses Linux cgroups and name spaces to isolate processes from each other so they appear to run on their own system.
Virtual machines require a fair amount of resources as they emulate hardware and run a full stack operating system. With Linux Containers there exists a lightweight alternative to full blown virtual machines while retaining their benefits.
Docker Architecture
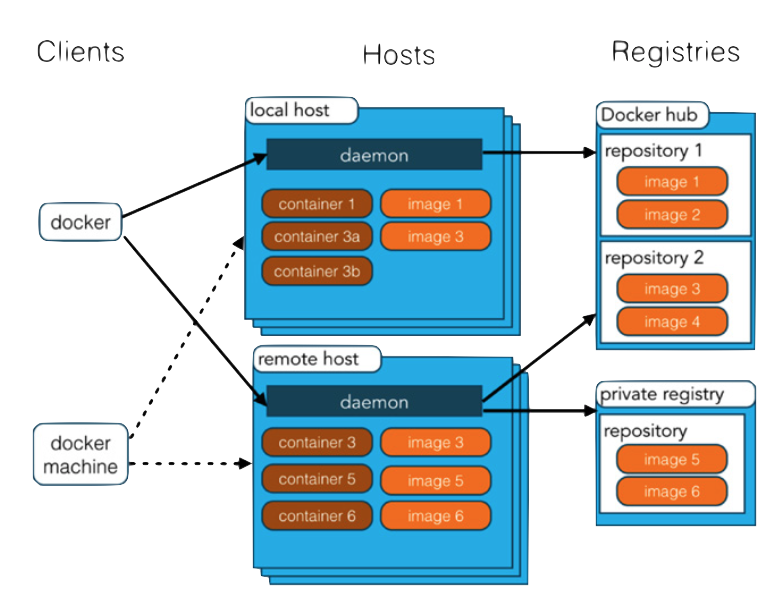
Docker consists of the following parts:
- Docker Daemon: runs as root and orchestrates all running Docker containers
- Docker Images: just as virtual machines are based on images, Docker containers are based on Docker images. These images are tiny compared to virtual machine images and are stackable thanks to AUFS storing only changes.
- Docker Repositories: Docker images can be exchanged with others and versioned like source code in private or public Docker repositories
Install Docker
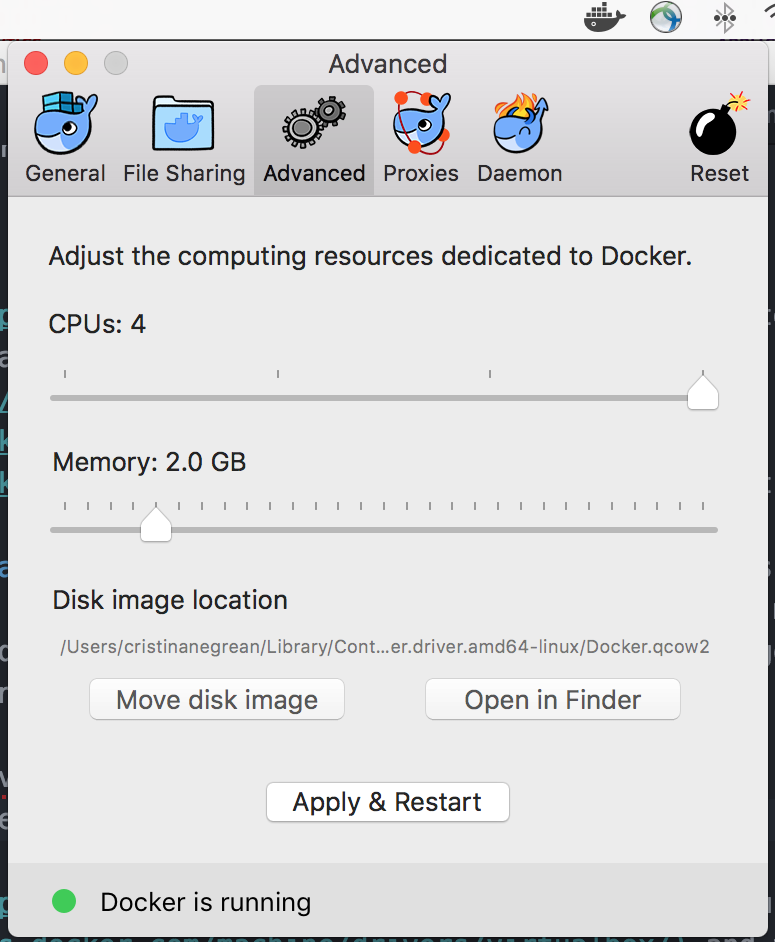
You’ll need Docker installed on your computer. Any of the Docker Native applications: Docker for Mac, Docker for Windows or Docker Toolbox will do the trick.
I am using Docker for Mac in this post, as I think it provides a much better Docker development experience on Mac, making it possible to configure a docker container with outside container storage without any workarounds on Mac, similarly how it works on Linux.
Docker for Mac application does not use VirtualBox, instead provisions a HyperKit VM based on Alpine Linux which is running the Docker Engine. So with the Docker for Mac application you get only one VM and the app manages it as opposed to Docker Toolbox where you could have created multiple VMs with docker-machine.
An alternative to the Docker Native Application is Docker Toolbox that uses VirtualBox and the installer includes the following:
- Docker Client docker binary
- Docker Machine docker-machine binary
- Docker Compose docker-compose binary
- Kitematic - Desktop GUI for Docker
- Docker Quickstart Terminal app
Typical Local Workflow
Docker has a typical workflow that enables you to create images, pull images, publish images, and run containers.
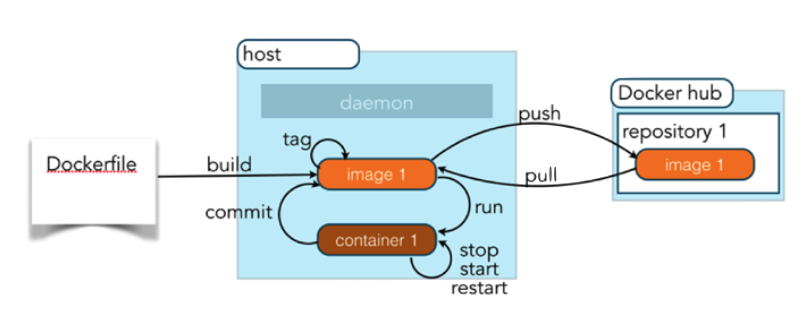
From Dockerfile to Docker Image
A Dockerfile describes how to build a Docker image. The FROM command defines the base image from which we start. My Docker Image derives from the Java runtime, by using a public OracleJDK 8 image. The images are looked up locally as well as in the publicly available Docker repository. The RUN command specifies which commands to run during the build process. Generally, all Docker containers run isolated from the world with no communication allowed — deny all policy. If there should be communication to the outside world, this must be explicitly defined through the EXPOSE command. In this example, port 9000 is exposed. The VOLUME commands specifies a mount point to which we can bind filesystems from the host operating system or other containers. This allows us to attach globally reusable and shareable mount point.
Listing 1: src/main/docker/Dockerfile
# Pull in the smallest Docker image with OracleJDK 8 (167MB)
FROM frolvlad/alpine-oraclejdk8:slim

# add bash and coreutils
RUN apk add --no-cache bash coreutils

MAINTAINER negrean.cristina@gmail.com

# We added a VOLUME pointing to "/tmp" because that is where a Spring Boot application creates working directories for
# Tomcat by default. The effect is to create a temporary file on your host under "/var/lib/docker" and link it to the
# container under "/tmp". This step is optional for the simple app that we wrote here, but can be necessary for other
# Spring Boot applications if they need to actually write in the filesystem.
VOLUME /tmp

# The project JAR file is ADDed to the container as "app.jar"
ADD open-travel-spring-boot-docker-1.0.0-SNAPSHOT.jar app.jar

#Expose Tomcat HTTP Port, by default 8080, the travel API overrides it via server.port=9000
EXPOSE 9000

# You can use a RUN command to "touch" the jar file so that it has a file modification time
# (Docker creates all container files in an "unmodified" state by default)
# This actually isn’t important for the simple app that we wrote, but any static content (e.g. "index.html")
# would require the file to have a modification time.
RUN bash -c 'touch /app.jar'

ENTRYPOINT ["java", "-Djava.security.egd=file:/dev/./urandom","-jar","/app.jar"]
Building Images: docker build and publishing them to a Docker repository: docker push
From Dockerfiles, Docker Images are built with each Dockerfile command generating a new Docker Image which can be individually accessed by its id — a git commit-like fingerprint.
As the Spring Boot application we are containerizing is based on Gradle build specification, it would seem most straightforward to use a gradle plugin for this purpose.
Listing 2: build.gradle
buildscript {
    ...
    dependencies {
        ...
        classpath('se.transmode.gradle:gradle-docker:1.2')
    }
}

group = 'cristinatech'

...
apply plugin: 'docker'

jar {
    baseName = 'open-travel-spring-boot-docker'
    version = '1.0.0-SNAPSHOT'
}

// copy the DockerFile into the build/libs folder
build.doLast() {
    copy {
        from 'src/main/docker'
        into 'build/libs'
    }
}
...

task buildDocker(type: Docker, dependsOn: build) {
  push = false
  applicationName = jar.baseName
  dockerfile = file('src/main/docker/Dockerfile')
  doFirst {
    copy {
      from jar
      into stageDir
    }
  }
}
Using the plugin, you can build a tagged docker image and then push it to a remote repository with Gradle in one command:
bash-3.2$ ./gradlew clean build buildDocker, and the outcome can be listed using docker images command, as bellow:
bash-3.2$ docker images | grep cristinatech/open-travel-spring-boot-docker
cristinatech/open-travel-spring-boot-docker   1.0.0-SNAPSHOT      4a1eee9b7dec        21 minutes ago      234 MB
In Listing 2: build.gradle, the task buildDocker toggles the
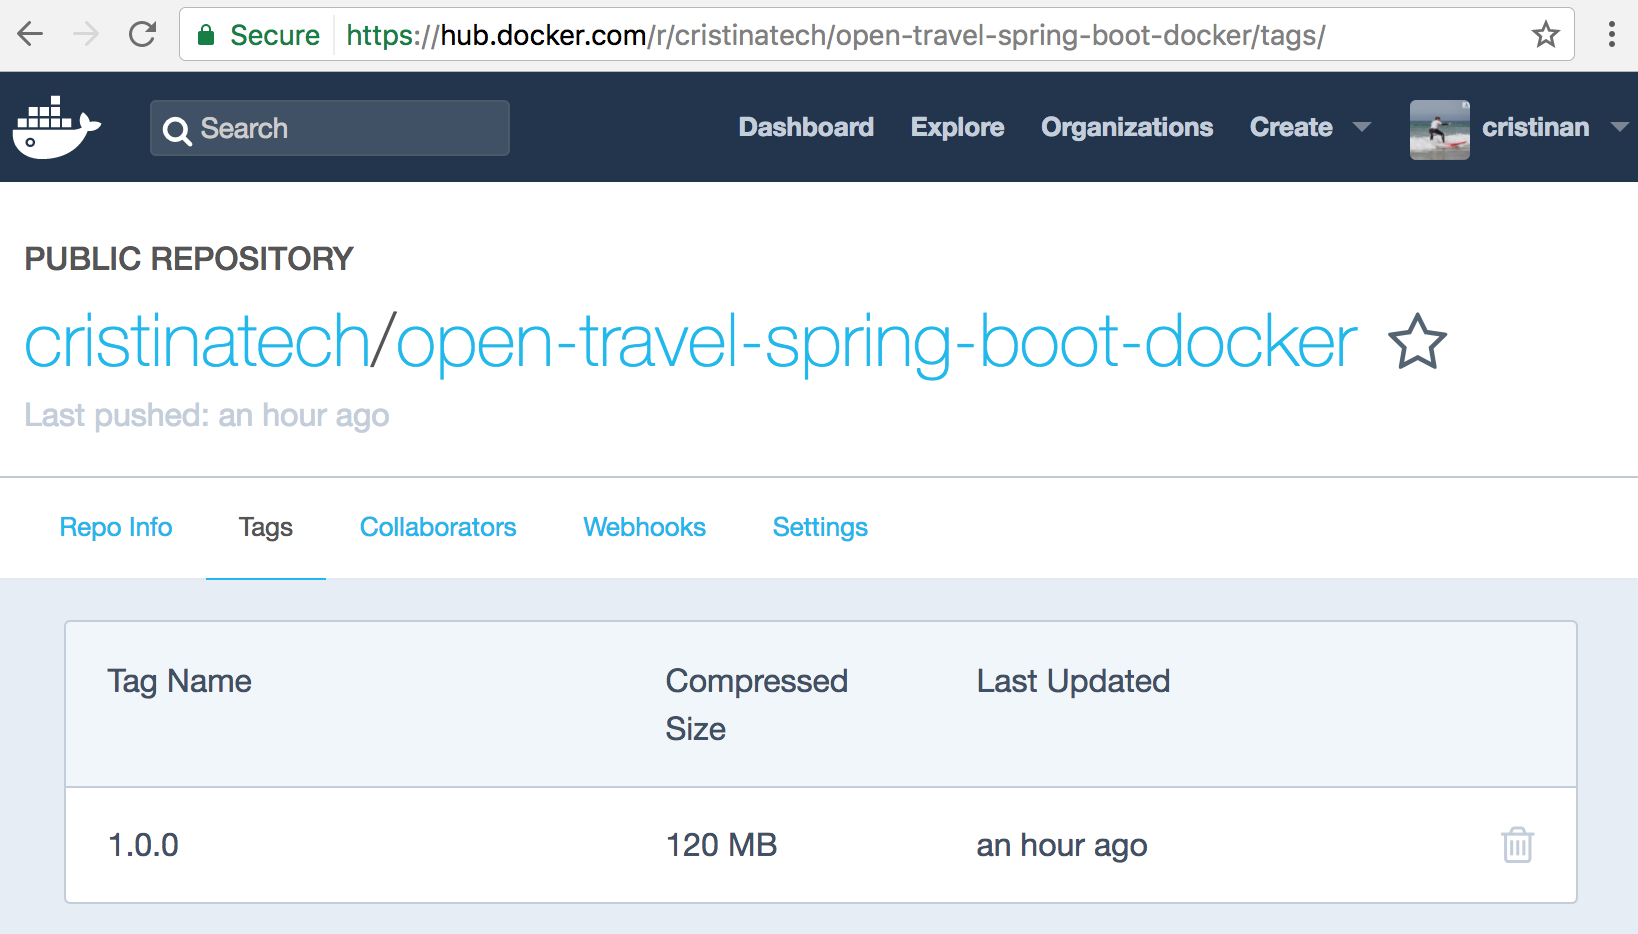
docker push as disabled, as it will fail, unless you are part of the “cristinatech” organization at Dockerhub.
If you change the configuration to match your own docker ID - see group syntax - then it should succeed, and you will have a new tagged, deployed image
at Dockerhub
The No Plugin Way
If you don’t want to use the Gradle Docker Build plugin, you can achieve all above Docker workflow steps: build, tag and push, using the command-line utility:
bash-3.2$ docker build -t cristinatech/open-travel-spring-boot-docker:1.0.0 build/libs
Sending build context to Docker daemon 29.67 MB
Step 1/8 : FROM frolvlad/alpine-oraclejdk8:slim
 ---> 323fb90cf52c
Step 2/8 : RUN apk add --no-cache bash coreutils
 ---> Using cache
 ---> 9319aa27f290
Step 3/8 : MAINTAINER negrean.cristina@gmail.com
 ---> Using cache
 ---> 6d73283e48b8
Step 4/8 : VOLUME /tmp
 ---> Using cache
 ---> fece2f069ff8
Step 5/8 : ADD open-travel-spring-boot-docker-1.0.0-SNAPSHOT.jar app.jar
 ---> Using cache
 ---> d5bad9f16f7e
Step 6/8 : EXPOSE 9000
 ---> Using cache
 ---> d0fbc760239f
Step 7/8 : RUN bash -c 'touch /app.jar'
 ---> Using cache
 ---> 8fe68044ea2f
Step 8/8 : ENTRYPOINT java -Djava.security.egd=file:/dev/./urandom -jar /app.jar
 ---> Using cache
 ---> b0a0e2919d95
Successfully built b0a0e2919d95
bash-3.2$ docker login
Login with your Docker ID to push and pull images from Docker Hub. If you don't have a Docker ID, head over to https://hub.docker.com to create one.
Username: cristinan
Password: ***********
Login Succeeded
bash-3.2$  docker push cristinatech/open-travel-spring-boot-docker:1.0.0
The push refers to a repository [docker.io/cristinatech/open-travel-spring-boot-docker]
287527c5d4a3: Pushed
ad4311298fda: Pushed
77cbeedc74c7: Pushed
ae32d7f4259f: Pushed
b840e4ee4509: Pushed
404361ced64e: Pushed
1.0.0: digest: sha256:bafb2d7d6d8430090d1fa8c1e0015130471dc3d2dc286917254abdbe3e017a06 size: 1586
bash-3.2$
Running Docker containers: docker run
To run a Docker image you just need to use the run command followed by a local image name or one found in DockerHub. Commonly, a Docker image will require some additional environment variables, which can be specified with the -e option. For long-running processes like daemons, you also need to use a –d option.
As the open travel API depends on a Postgresql 9 datastore, to start the postgres image, you would run the following command to configure the PostgreSQL root user’s password, as documented in the Docker Hub postgres repository documentation:
bash-3.2$ docker run --name wanderlustdb -e POSTGRES_PASSWORD=mysecretpassword -d postgres
bash-3.2$ docker run -e "SPRING_PROFILES_ACTIVE=postgres" -p 9000:9000 -t cristinatech/open-travel-spring-boot-docker:1.0.0-SNAPSHOT
But wait! There is a much simpler way, especially when you have more that 2 containers! By leveraging Docker Compose which has already been installed with the Docker for Mac native application!
Docker Compose is a tool for defining and running multi-container Docker applications. It needs a Dockerfile - which we already have - so the app’s environment can be reproduced anywhere. The magic happens in docker-compose.yml where you need to define the services that make up your application, so they can be run together in a isolated environment.
My docker-compose.yml looks like bellow:
Listing 3: docker-compose.yml
version: '2'
services:
  postgresdb:
    container_name: wanderlust-datastore
    image: postgres:9.6.3
    ports:
         - "5432:5432"
    environment:
         - POSTGRES_USER=postgres
         - POSTGRES_PASSWORD=demo
    command: postgres
  web:
    container_name: open-travel-service
    build: build/libs
    image: open-travel-spring-boot-docker
    depends_on: # wanderlust-datastore will be started before the open-travel-service
      - postgresdb
    ports:
      - "9000:9000"
    links:
      - postgresdb
    environment:
      #SPRING_PROFILES_ACTIVE: postgres
      SPRING_DATASOURCE_URL: jdbc:postgresql://postgresdb:5432/postgres
      SPRING_DATASOURCE_USERNAME: postgres
      SPRING_DATASOURCE_PASSWORD: demo
Lastly, run docker-compose up and Compose will start and run the entire app.
bash-3.2$ docker-compose up